Tuesday, April 19, 2011

Create dynamic images in php

Simple task: user input as string to be applied with a custom font on a given image.


You can view a demo here.

Features:
  • the font size is calculated depending on image's height;
  • the number of characters displayed on a row is calculated depending on image's width and calculated font size;
  • the text is split to pe displayed on multiple lines;
  • user can pick the text color on image;
  • the text has transparency;
  • the resulting picture is provided for download.
If you have suggestions or need the code, feel free to email me (write a suggestive email subject)

Friday, April 15, 2011

me and my facebook(s) - part 2

Friday evening, at the office, waiting for a server to "get real"...it won't
Anyway, the last weeks I had to do some stuff with the new Facebook API (which is really ok, I suppose...only it is not documented in a very efficient manner, so I end up spending hours for some simple tasks).

So, 2 easy hints if you want to upload a picture with the API (you will find tones of examples of code of how-to, the actual algorithm, using a PHP library which wraps the requests in a more elegant way, or directly with CURL):
1.For upload need special permissions - main permissions: read_stream, publish_stream, photo_upload, user_photos
2. Before the upload code you need to set the upload file support
$facebook->setFileUploadSupport(true); 
Now, some other things I had to do were 1. to save a picture (from the disk) to a Facebook user Profile album and 2. eventually open it so the user has the possibility to set it as his/her Profile Picture. The first thing is possible if the user already has a Profile Picture album. Otherwise you can not create from API that type of album (with type = 'profile' ). If the user did not have a profile picture yet it will be saved in an album with the application name.
The second part is alittle tricky, because Facebook would not allow an application to mess around with stuff which is part of user's privacy - such as the profile picture, so all you can do is open a new window with the saved picture in Facebook and let the user decide if he/she wants that picture to be his/her profile picture. How to do that? The action of saving a picture to profile/or_not_profile_yet album will return you the ID of the picture (in the Facebook graph), say it's $pid. The url where the user can see the picture and take the decision I've talked above looks something like this:

http://www.facebook.com/photo.php?fbid=$pid&makeprofile=1

Sunday, March 20, 2011

me and my facebook(s)

I just read an article about the new scams that moved on Facebook. One of the comments was that it is actually impossible to delete your account on Facebook so I wanted to give it a try. By the way, about 2 weeks ago I activated the option so that no one can comment on my wall and there was 1 person who seized talking to me any more and another who really felt like asking me if I am mad on her or not (which is hilarious...I am sorry, I still can't believe there are people out there who take social networks so seriously).
Anyway, two years ago I had to develop some applications for Facebook and I made like 14-15 users (because I needed to activate the pagination on friends list) so I picked one of them that I still remembered the credentials and tried to delete it. No, you can't delete the account, but you can "Deactivate" it from the Account Settings. Clicking on that option gets you to a very pathetic page with a list of the "friends" that will miss you if you do that (!!!!). Then they ask you the reason, which is ok...then, and that kinda freaked me out (just for 2 seconds, I am still sick so my mind doesn't react properly, or the way it used to) I read this:

Note: Even after you deactivate, your friends can still invite you to events, tag you in photos, or ask you to join groups. If you opt out, you will NOT receive these email invitations and notifications from your friends.

After 2 seconds I made a search on Google on "permanently delete your Facebook account" and I found some info here. So they have an application that deletes accounts for good. They give you an interval of 14 days to come back and cancel the deletion: Your account has been deactivated from the site and will be permanently deleted within 14 days. If you log into your account within the next 14 days, you will have the option to cancel your request.

P.S. I just deleted the account I made on the name of "Sandra Bullock"...after 13-14 sign ins I was totally out of inspiration

Tuesday, March 15, 2011

Când am încetat să mai fiu un zeu

Când am încetat să mai fiu un zeu?

Neuronii'ţi sincopau în 
 ritmul respiraţiei mele
Frunzele veştede toamna cădeau în 
cadenţa paşilor mei
Stelele apăreau pe cer după 
extrasistolele inimii mele.

În zvâcniri nevinovate
Ne dădeam cu capul de pereţii 
imaculaţi de sticlă
Ai propriei noastre voinţe.

Când am încetat să mai fiu un zeu?...
Nici că mai contează
În umanitatea-mi sieşi însăşi atot-suficientă.

Nu...acest text nu a fost generat de un script...dar ar fi putut fi.

Wednesday, February 9, 2011

WordPress plugin - Domains Update

I dared a few days ago to share a plugin I made with my work mates. It took me about 10 days to decide to do it (the sharing part). Last night my boss called me to ask me how to use it and in the end his conclusion was that it was not doing what I said it would...but, as usual, I had the "revelation" in the morning - meaning like 10 minutes ago.

So, I decided to put it here and see what kind of problems other people might have with it(omg...I am so evil).

What I pretend this plugin to do: updates values in database.

When you should use it: when you move your Wordpress site from one domain to another and you want to keep the database consistent.


Let's imagine the scenario when you move your Wordpress site from location A to B.

Options description:
1. Old domain - in our case would be A
2. New domain - in our case would be B
3. URL format - uncheck it if any of the domains does not have an URL format (e.g. localhost)
4. Select custom table(s) - when you press this button a list of the Wordpress' database tables is shown. When you select a table, a list of its columns is shown. Use this to update the values of old to new domain in other tables than wp_posts and other columns than wp_posts.guid and wp_posts.post_content (these are the default location of the update).
5.Update only custom tables - if this option is selected the default locations are skipped.
6. Run changes - runs the database updates.

Note 1: you can run this plugin multiple times.
Note 2: if you need to make updates in custom tables make sure you selected at least one table and for each table at least one column (otherwise it will tell you that there was no data to update).
Note 3: you might wonder why the plugin's name is Domains Switcher and in administrator's dashboard the name is Update Domains. Because I like to screw users' mind.

One more thing. The steps I follow when I need to move a Wordpress site from domain A to domain B and on domain A there is already content that needs to pe kept on domain B:
  1. Copy all needed files from A to B
  2. Export-import database from A to B
  3. On B, go to database and in table wp_options where column option_name has value siteurl and home the column option_value should have value A. Change it to B.
  4. On B, open file wp_config.php and update the information for database connection on B
  5. Enter wordpress admin on B (now you should be able to do that) and install and activate the Domains Switcher aka Update Domains plugin
  6. If all you need to update are posts and pages, run it with simplest configuration (without custom tables). The files uploaded and inserted into posts now will be taken from B, instead of A.
  7. If you used plugins which create their own tables, run the plugin against tables and columns that you know might contain URLs (e.g. for a slideshow plugin, it might keep in a custom table the links to images it uses)
  8. Sometimes plugins which do not create their own tables might insert links in column wp_postmeta.meta_value

You can download the plugin from here.

Known issue: Don't use it to update the information in cformsII plugin. It will alter the serialized string containing the cforms settings (and the plugin will stop from working). If you need to move cformsII to another domain, my suggestion is to install the plugin to the new locationa and backup-restore the forms from the old domain to the new one. If you have more than one form created with cformsII, just add new forms and backup-restore them. The global forms settings need to be update "manually" though.

Tuesday, February 8, 2011

How to add different custom content on WordPress pages

In the last few months I had to work on different WordPress sites which required different content on different pages. That content was supposed to be manageable from WordPress administrator account. As I was new to WordPress I decided to create a plugin each time I needed manageable content to appear on different pages. This morning I just figured out how to take advantage of some already made WordPress plugins which would make this task much easier and much efficient, from my point of view.

Let's take the example of adding different Sidebars on each page of a site.
1. The plugin I am using is Custom Post Type UI. After installing and activating it I define my custom type Sidebars. From plugin's Advanced Options I choose it to support Title, Editor and Custom Fields. I also define a taxonomy for this custom type, called Page Sidebars and I attach it to Post Type pages.


2. Now in Dashboard I have a new option to administrate the custom type I just defined. So all I have to do is to go to Sidebars and start adding new content of this type.


3. When I insert new pages in the left of the editing window I can add the custom types by their title.


4. Now the code I use in sidebar.php from my theme to get for each page the content of each custom type sidebar related to each page.
/* get the global post variable to know on what page you are on */
global $post;
/* for the given page, get the taxonomies of type page_sidebars */
$data          = get_the_terms($post->ID, 'page_sidebars');
$my_sidebars   = array();
foreach($data as $sidebar):
/* get the post of type sidebars with the name of the page_sidebars taxonomy */
$my_sidebars[] = get_post_by_name($sidebar->slug, 'sidebars');
endforeach;


In functions.php of your theme define
function get_post_by_name($page_name, $post_type = 'post', $output = OBJECT) {
   global $wpdb;
   $post = $wpdb->get_var( $wpdb->prepare( "SELECT ID FROM $wpdb->posts WHERE post_name = %s AND post_type= %s", $page_name, $post_type ));
   if ( $post )
      return get_post($post, $output);

   return null;
}
Note: If you need new fields for your custom types, there is another plugin easy to use and integrate with Custom Types UI: Custom Field Template

Sunday, January 30, 2011

PhpMyAdmin for beginners

First of all, what is PhpMyAdmin? The name itself reveals all needed information: PhpMyAdmin is a tool for administration of MySQL servers and it is written in PHP. The "thing" about PhpMyAdmin is that it is a browser application and it is used over World Wide Web.

Some of the main things you can do with id: create/drop a database, create users with different privileges for databases, create/empty/drop tables, insert/update/delete tables' information, run SQL queries in databases, import/export databases/tables.

1. Set the language for PhpMyAdmin

In the login window you have the option for language. Choose the one you want to work in, insert the username and password for th application and login to it.

2. Create a database


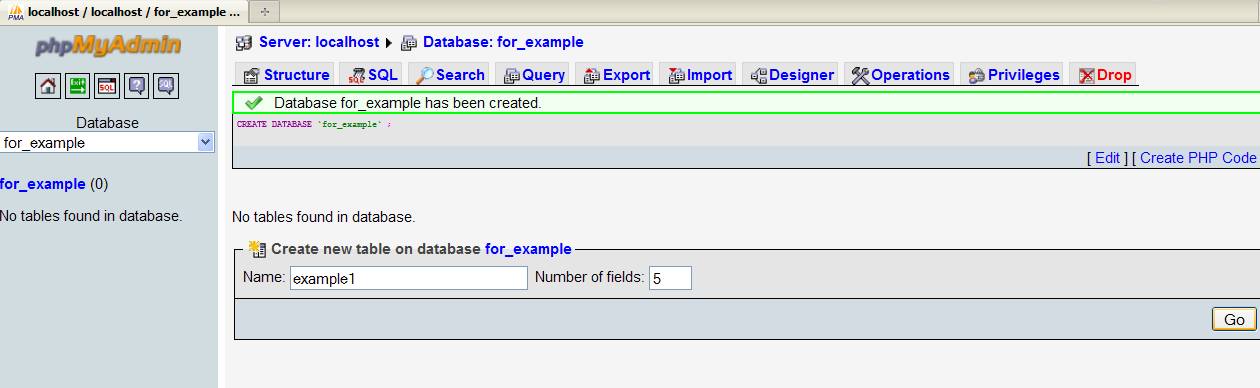
After you successfully login to PhpMyAdmin you can create a new database. One of the details is the Collation. If you plan to store in database data that will contain diacritics, than choose at least utf8_general_ci as collation. After you create the database, you can create tables (which are related to that database)
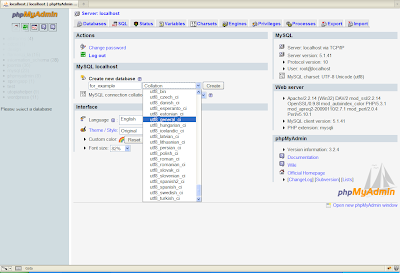


3. Create a table


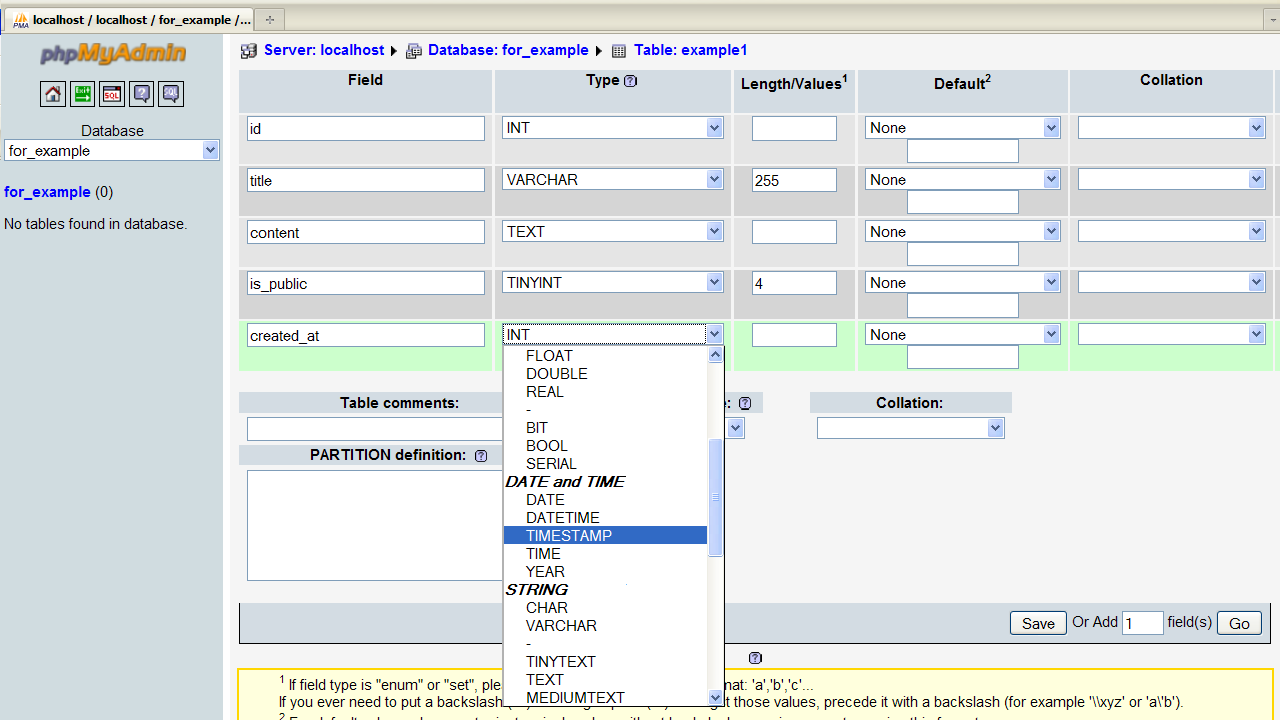
4. Define the column types of a table
More about MySQL types here.


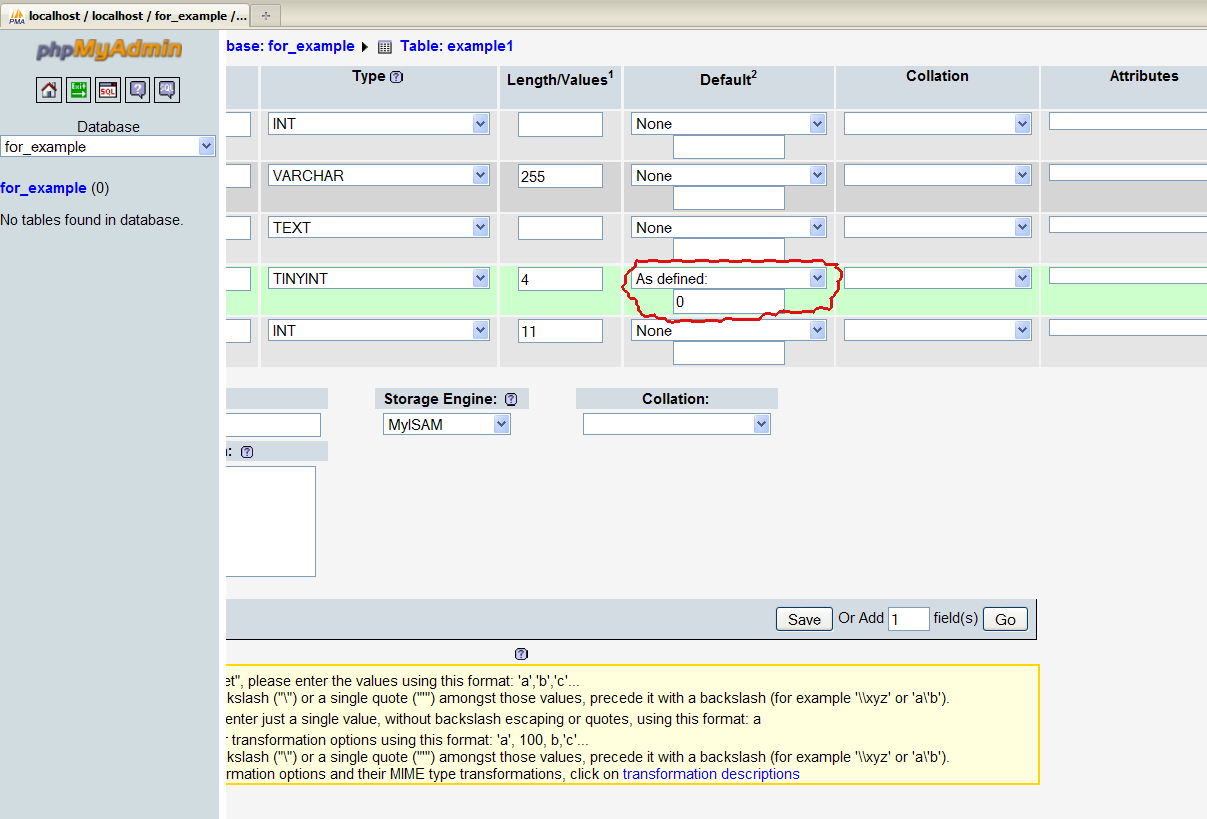
For data kept in a certain column you can set the default value as NULL (the information kept in that table does not need to be initially defined, it can be "inserted" in that table after the reference to it is defined - in SQL representation it means that data can be added in the table at UPDATE), or you can define a default value (as shown in the picture below). This is used especially for columns which keep flag values.


When creating a table another important issue is the INDEX - in SQL a primary key. It usually is set as auto-increment. The options to do that are shown in the picture below:


Also, for table's columns which might contain diacritics (such as title and content for an article) you can define the needed collation.


If you find out you need more columns, you can write the number of extra needed columns in the text field in right bottom of the columns definition page and click Add, or if you finished defining the description of table's columns click Save. Now you can see the structure of the defined table as shown in the picture below. The actions that can be taken to a column(from left to right) are: Browse (view the values of that column), Edit, Delete, Make Primary key, Make Unique key, Fulltext (used in fulltext searches, available in MyISAM tables)


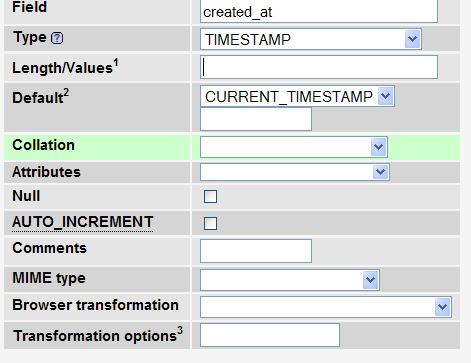
A detail regarding DATE fields. Per table can be defined one TIMESTAMP column. There also can be used INT(11) to manipulate fields containing date. In the picture below is edited the created_at column to be timestamp and the default value to be the current timestamp.


4. Insert data into table

When you click on Insert in the main tabs on the page (between Search and Export), you can put down the values for each column. The default null columns can contain no data, also the primary key or the columns which have defined a default value. After you insert the needed information, click Go. As you will see in the first image below, at the bottom of the columns editing there are some more actions you can take:
  • what action to be taken after insertion, Default is: "Go back to previous page". Another option here is "Insert another new row". You can choose this if you want to continue to insert values into the table.
  • Also, you can insert in one action more than 2 rows. "Restart insertion with n rows", The n can be selected from a list.
After you finish inserting you can Browse data into table (second image below).


5. Writing interrogation for data in tables
This is not so a "beginners" field, but for those who want to learn more about SQL queries, can read for a start here. To write SQL queries go to SQL tab and after you write the query, click on GO to run it.
Below are 2 examples:
1. How select only data which has flag is_published set on 1 (first picture, the query, second the select result)


2. for all rows which are not published (flag is_published is 0), make the content NULL


6. Export a database
Before you start "playing" with tables and queries a wise think to do is to Export the database, so you make sure you can recover the data if you mess up something. For that go to Export tab (between Insert and Import). You can backup data on the database's server or save them in a file (which can be used to import the database to another location).


7. Delete a database
On the top of the PhpMyAdmin page you can see some links which are a breadcrumb. Click on Server:your_server_name and now you have in the main tabs the option of databases. When click a list of all databases defined on server will be displayed. You can select the checkbox(es) for the database(s) you want to delete and click the red X button below the list (if you mouse over that button it will show you the text "Drop").
Note: to be able to delete a database the user you are logged in must have the privileges to do that action.


8. Create users and give them privileges for your databases
As mentioned above (section 7.) an user can have different privileges on a database. To define an user and set his rights on a database, go to Server link and choose Privileges. Here you can Add a new user or edit the already existing ones.
Note: be careful with what you set in this section. Don't give everyone the right to delete your databases:)


9. Import a database
If you exported a database and save it in a file, now you can go to another location (MySQL server) and import it there. In my example, I have dropped the for_example database and created a new one called second_example. Now I want to bring all I had in the first database into the second one with only 2 clicks (metaphorically speaking...or not!). Go to the new database where you want to do the import. First click would be on the Import tab (between Export and Designer). Select the file you created on the export of the first database. The second click should be on Go.